Tuesday, May 24, 2011


Simplex Eshop - Blogger template for shopping cart/ecommerce
Some of you asked me for Ecommerce /shopping cart in Blogger platform . My result is template SimplexEshop .This is a test template and need more time to finish because every shop has its own options in shipping/tax rate/price/promotion ,and fill all needs with only Javascript is an impossible mission . But I want to show it here to get your feedback and hope I can make it better .

Live Demo | Download
2,Open template file in a word editor .
3, To make a menu navigation

Find this code
<ul id="nav">
<li><a href="http://simplexeshop.blogspot.com">Home</a></li>
<li><a href="http://simplexeshop.blogspot.com/search/label/shop">Store</a>
<ul class="children">
<li><a href="">Category</a></li>
<li><a href="">Category</a></li>
</ul>
</li>
<li><a href="http://simplexeshop.blogspot.com/search/label/blog">Blog</a></li>
</ul>
Add link to your categories like my other template . You can see on Simplex Enews or Simplex Transcript for more about this multi-level menu .
4,Basic Shop Setting
This template was built based on SimpleCart solution (Simplecartjs.com ) , what I did only integrated Simplecart to a blogger template . So all options /setting for shop ,you can see in simplecart documentation .
a,Payment method
This Template support two payment methods : Paypal and Google Checkout . Default is Paypal ,and it was set in these line :
If you want to use Paypal ,you can replace brett@wojodesign.com to your paypal email .
If you want to use Google Checkout ,you can replace two lines above with
Change 111111111111111 to your Google Checkout merchant ID .
b,Currency
This template support GBP,USD ,and EUR . Default is USD and it was set in this line
if you want to change the currency ,you can change USD in the line above (marked in bold) to GBP or EUR .
c,Tax rate
The default tax rate was set in this line
You can change the value from 0.08 to another rate . If you don't want to add the tax rate ,you can delete this line
d,Shipping
There are many ways to calculating the shipping cost for an order :
-Add a flat rate to the entire order .This is the default method in template and it was set in this line
(an amount 5.25 shipping cost will be added to the entire order )
You can change 5.25 to the value you want .
-Add a shipping cost to every item in the cart : if you want to use this method ,you can delete simpleCart.shippingFlatRate = 5.25;
and use this line
-Add a shipping cost as percentage of total cost : to use this method ,you can delete the default simpleCart.shippingFlatRate = 5.25;
and use this :
This line will add a shipping cost as 5% to the total cost .You can change this rate to another value .
If you require some advanced calculations for shipping, you can delete the default line and use the prototype object for CartItems:
The 'this' here refers to the item, and we are using a 'size' field and the item 'quantity' to calculate the shipping. Because an item may or may not have a size, we check to make sure it does with the 'if(this.size)'. If there is a size field, we use a different rate for each size and return a value based on the item quantity. Otherwise, we use a base rate of 2.00. simpleCart(js) will use the global shipping rates, and then add the shipping value for each item in the cart.
5,When you finish editing ,upload template to Blogger . Go to Dashboard ->Design ->Page elements
6,To add logo

click on logo widget

add logo as this image bellow

7,There are many places that you can add your own widget . For example ,you can add link list widget for making category menu ,subscription widget ,page list widget ...

8,That's all for install this template .
To post product to shop : Go to Dashboard -> Posting -> New Post .Click on Edit HTML and made a post with this structure
<div id="description">
<img src="image url goes here">
<img src="image url goes here">
<img src="image url goes here">
PRODUCT INFORMATION..........
........................
</div>
<div class="simpleCart_shelfItem">
<span class="item_name">item name ...</span>
Price : <span class="item_price">price .........</span>
Quatity : <input class="item_quantity" type="text" value="1" />
<a href="javascript:;" class="item_add" title="Add to Cart">Add to Cart</a>
</div>
In structure above , this is the product information section :
<div id="description">
<img src="image url goes here">
<img src="image url goes here">
<img src="image url goes here">
PRODUCT INFORMATION GOES HERE..........
........................
</div>
you can add image by using <img src="image url goes here"> and add product description bellow (in the text product information goes here )
After the product information section ,we move to add to cart section :
<div class="simpleCart_shelfItem">
<span class="item_name">item name ...</span>
Price : <span class="item_price">price .........</span>
Quatity : <input class="item_quantity" type="text" value="1" />
<a href="javascript:;" class="item_add" title="Add to Cart">Add to Cart</a>
</div>
in this section ,add the item name in where I marked item name .... ,add the price in where I marked price ... and change the quatity from '1' to another value .
If you want to set a special shipping cost for this item only ,you can add this line to the add to cart section
<input class="item_shipping" value="xxx" type="hidden">
replace xxx to the shipping cost of this item
and the code of Add to cart section will become :
<div class="simpleCart_shelfItem">
<span class="item_name">item name ...</span>
Price : <span class="item_price">price .........</span>
Quatity : <input class="item_quantity" type="text" value="1" />
<input class="item_shipping" value="xxx" type="hidden">
<a href="javascript:;" class="item_add" title="Add to Cart">Add to Cart</a>
</div>
When you set shipping cost for an item ,the method which used to calculate shipping fee in step 4 will be overide .
After finish editing the post with structure above ,add a label 'shop' at the end of post ,and the product will be added to shop with sliders ,price and add to cart function
To post to Blog : to post to blog ,you can make a normal post ,and add a label 'blog' at the end of post .
It's similar to my older template Simplex Portfolio ,in Simplex Portfolio ,we have two display mode : display a post as a post in gallery ,and display a post as a normal blog post .In this template ,we also have two display mode : display a post as product in shop and display a post as a normal blog post .
For the page : you can make pages as normal .
That's all for this template . I think it is not easy to use and handle .If you familliar with the code ,you can take a try ^^ For detail shopping cart settings ,you can see more in simplecartjs
Feel free to leave me feedbacks
Live Demo | Download
How to install this template
1,Download the template file .2,Open template file in a word editor .
3, To make a menu navigation
Find this code
<ul id="nav">
<li><a href="http://simplexeshop.blogspot.com">Home</a></li>
<li><a href="http://simplexeshop.blogspot.com/search/label/shop">Store</a>
<ul class="children">
<li><a href="">Category</a></li>
<li><a href="">Category</a></li>
</ul>
</li>
<li><a href="http://simplexeshop.blogspot.com/search/label/blog">Blog</a></li>
</ul>
Add link to your categories like my other template . You can see on Simplex Enews or Simplex Transcript for more about this multi-level menu .
4,Basic Shop Setting
This template was built based on SimpleCart solution (Simplecartjs.com ) , what I did only integrated Simplecart to a blogger template . So all options /setting for shop ,you can see in simplecart documentation .
a,Payment method
This Template support two payment methods : Paypal and Google Checkout . Default is Paypal ,and it was set in these line :
simpleCart.email = "brett@wojodesign.com";
simpleCart.checkoutTo = PayPal;
If you want to use Paypal ,you can replace brett@wojodesign.com to your paypal email .
If you want to use Google Checkout ,you can replace two lines above with
simpleCart.merchantId = "111111111111111";
simpleCart.checkoutTo = GoogleCheckout;
Change 111111111111111 to your Google Checkout merchant ID .
b,Currency
This template support GBP,USD ,and EUR . Default is USD and it was set in this line
simpleCart.currency = USD;
if you want to change the currency ,you can change USD in the line above (marked in bold) to GBP or EUR .
c,Tax rate
The default tax rate was set in this line
simpleCart.taxRate = 0.08;
You can change the value from 0.08 to another rate . If you don't want to add the tax rate ,you can delete this line
d,Shipping
There are many ways to calculating the shipping cost for an order :
-Add a flat rate to the entire order .This is the default method in template and it was set in this line
simpleCart.shippingFlatRate = 5.25;
You can change 5.25 to the value you want .
-Add a shipping cost to every item in the cart : if you want to use this method ,you can delete simpleCart.shippingFlatRate = 5.25;
and use this line
simpleCart.shippingQuantityRate = 3.00;
This line will add an amount 3.00 to every item in the cart .Of course ,you can change 3.00 to other value .-Add a shipping cost as percentage of total cost : to use this method ,you can delete the default simpleCart.shippingFlatRate = 5.25;
and use this :
simpleCart.shippingTotalRate = 0.05;
This line will add a shipping cost as 5% to the total cost .You can change this rate to another value .
If you require some advanced calculations for shipping, you can delete the default line and use the prototype object for CartItems:
CartItem.prototype.shipping=function(){
// we are using a 'size' field to calculate the shipping,
// so we first make sure the item has a size
if(this.size){
if( this.size == 'small' ){
return this.quantity*5.00;
} else if( this.size == 'large') {
return this.quantity*7.50;
} else {
return this.quantity*10.00;
}
} else {
// use a default of $2.00 per item if there is no 'size' field
return this.quantity*2.00;
}
}
The 'this' here refers to the item, and we are using a 'size' field and the item 'quantity' to calculate the shipping. Because an item may or may not have a size, we check to make sure it does with the 'if(this.size)'. If there is a size field, we use a different rate for each size and return a value based on the item quantity. Otherwise, we use a base rate of 2.00. simpleCart(js) will use the global shipping rates, and then add the shipping value for each item in the cart.
5,When you finish editing ,upload template to Blogger . Go to Dashboard ->Design ->Page elements
6,To add logo
click on logo widget
add logo as this image bellow
7,There are many places that you can add your own widget . For example ,you can add link list widget for making category menu ,subscription widget ,page list widget ...
8,That's all for install this template .
How to use this template
It's a little bit difficult when using this template .To post product to shop : Go to Dashboard -> Posting -> New Post .Click on Edit HTML and made a post with this structure
<div id="description">
<img src="image url goes here">
<img src="image url goes here">
<img src="image url goes here">
PRODUCT INFORMATION..........
........................
</div>
<div class="simpleCart_shelfItem">
<span class="item_name">item name ...</span>
Price : <span class="item_price">price .........</span>
Quatity : <input class="item_quantity" type="text" value="1" />
<a href="javascript:;" class="item_add" title="Add to Cart">Add to Cart</a>
</div>
In structure above , this is the product information section :
<div id="description">
<img src="image url goes here">
<img src="image url goes here">
<img src="image url goes here">
PRODUCT INFORMATION GOES HERE..........
........................
</div>
you can add image by using <img src="image url goes here"> and add product description bellow (in the text product information goes here )
After the product information section ,we move to add to cart section :
<div class="simpleCart_shelfItem">
<span class="item_name">item name ...</span>
Price : <span class="item_price">price .........</span>
Quatity : <input class="item_quantity" type="text" value="1" />
<a href="javascript:;" class="item_add" title="Add to Cart">Add to Cart</a>
</div>
in this section ,add the item name in where I marked item name .... ,add the price in where I marked price ... and change the quatity from '1' to another value .
If you want to set a special shipping cost for this item only ,you can add this line to the add to cart section
<input class="item_shipping" value="xxx" type="hidden">
replace xxx to the shipping cost of this item
and the code of Add to cart section will become :
<div class="simpleCart_shelfItem">
<span class="item_name">item name ...</span>
Price : <span class="item_price">price .........</span>
Quatity : <input class="item_quantity" type="text" value="1" />
<input class="item_shipping" value="xxx" type="hidden">
<a href="javascript:;" class="item_add" title="Add to Cart">Add to Cart</a>
</div>
When you set shipping cost for an item ,the method which used to calculate shipping fee in step 4 will be overide .
After finish editing the post with structure above ,add a label 'shop' at the end of post ,and the product will be added to shop with sliders ,price and add to cart function
To post to Blog : to post to blog ,you can make a normal post ,and add a label 'blog' at the end of post .
It's similar to my older template Simplex Portfolio ,in Simplex Portfolio ,we have two display mode : display a post as a post in gallery ,and display a post as a normal blog post .In this template ,we also have two display mode : display a post as product in shop and display a post as a normal blog post .
For the page : you can make pages as normal .
That's all for this template . I think it is not easy to use and handle .If you familliar with the code ,you can take a try ^^ For detail shopping cart settings ,you can see more in simplecartjs
Feel free to leave me feedbacks
SimplexMag - a template for magazine or portfolio


Saturday, April 23, 2011
Blogger, Redesigned
Posted by Jinwoo Lee, Blogger tech lead
As we shared before, our team has been hard at work on a brand new, next generation design for Blogger. After doing a sneak preview at the South by Southwest conference back in March, we received some great feedback from the media:
Today, we're thrilled to announce the public launch of our redesign! But please wait a second before you go check out your Blogger dashboard, because we're planning a gradual rollout that will start with a limited set of users who visit our new feature testing ground, Blogger in Draft. At the start, only some of you (lucky draws!) can see the new design on Blogger in Draft. Over the course of the next few days and weeks we'll be ramping up to support all Draft users. There is no sign-up or activation process required from your side; just wait, and you'll notice your dashboard has changed to the new design when you log in to Blogger in Draft. 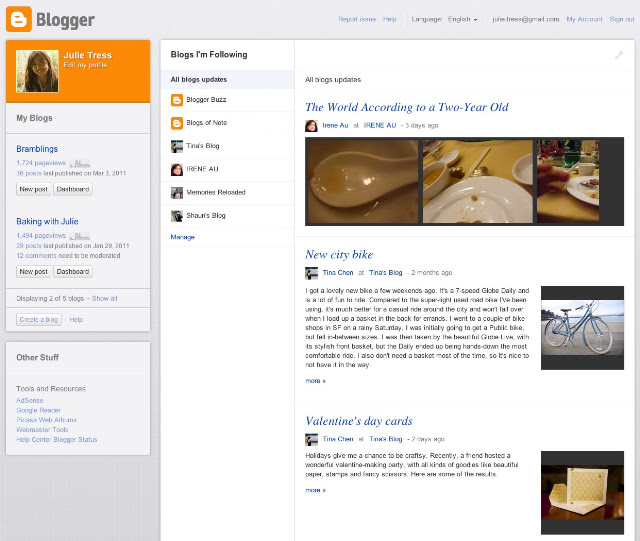
This is only the beginning of many exciting updates that we're planning for Blogger this year, so stay tuned!

As we shared before, our team has been hard at work on a brand new, next generation design for Blogger. After doing a sneak preview at the South by Southwest conference back in March, we received some great feedback from the media:
- Half A Billion Blog Posts Later, Google To Give Blogger A Revamp
- Google's Blogger Is About to Get an Overhaul
Although our team has been hard at work cranking out tons of new features over the last year or so, it's been a while since our user interface has had a major update so we're very excited about Blogger's fresh new look. However, there's much more to the redesign than shiny new graphics and pages—we've essentially rewritten the entire application from scratch, using the latest web technologies that will enable us to make future updates in more agile and flexible ways.
We decided to make the new UI available to our loyal Blogger users as quickly as possible. We realize there might be some 'rough edges' (see this page for the known issues) but fear not, we'll be continually updating and improving the experience until it's ready to graduate from Blogger in Draft. Our team is also very eager to hear your feedback, so please don't hesitate to let us know of any bugs or suggestions by clicking on the "Send feedback" link in the navigation bar (or directly on this form).
We decided to make the new UI available to our loyal Blogger users as quickly as possible. We realize there might be some 'rough edges' (see this page for the known issues) but fear not, we'll be continually updating and improving the experience until it's ready to graduate from Blogger in Draft. Our team is also very eager to hear your feedback, so please don't hesitate to let us know of any bugs or suggestions by clicking on the "Send feedback" link in the navigation bar (or directly on this form).
This is only the beginning of many exciting updates that we're planning for Blogger this year, so stay tuned!
Saturday, April 16, 2011


Friday, April 8, 2011
Beyond Design: 5 Tips for Making Your Blog More Reader-Friendly

This guest post was written by Alvina Lopez of accredited online colleges
For those of you bloggers who are knowledgeable about the ins and outs of website design, you definitely have a leg up in the blogosphere, as most bloggers aren't completely aware how much a blog's layout and color scheme affects a reader's attention. At the same time, however, there are a few other considerations that design-centric bloggers might want to keep in mind, especially in terms of writing. Here are just a few:
1. The title is more important than you think.
Titles are something that some bloggers put more emphasis on than others. But we could all do with placing a particular importance on making each title something special. It is, after all the first thing our readers lay their eyes on. When thinking of titles, consider your own browsing history. When you read the news online, which articles do you tend to click on? How are their respective titles worded? Checking articles that top the most popular lists is also a good way to improve your blog titles.2. Paragraphs and blog posts that are too long turn off lots of net readers.
Paragraphs and articles that are too short make you look lazy.Obviously, most bloggers know that writing paragraphs that are too long can tire readers out. Remember, the Internet is a veritable breeding ground for ADHD. At the same time, however, articles or paragraphs that are super short make your material look skimpy. Find a happy medium, and remember that most Internet readers especially like list posts.
3. Justified paragraphs are pleasing to the eye.
Some may disagree with me on this one, but having justified paragraphs like they do in newspapers is an aesthetic consideration that makes things easier to read. You can do this by hitting the "justify" button on Word if you do take write your first drafts on a word processor. It gives your blog articles a cleaner appearance. Off-setting quoted material in a different-colored box works well, too.4. The placement of good hyperlinks is absolutely instrumental in drawing and keeping a reader's attention.
Hyperlinks that link out to related material are one of the hallmarks of good blog posts and Internet writing in general. But be careful. Placing too many hyperlinks can overwhelm your readers, and placing too few makes your blog post come off as not very authoritative and lacking supporting sources. Be sure to include links to quality material (i.e. stay away from content farm type stuff).5. Cycling between the pyramid and inverted pyramid, depending on circumstances, keeps things fun and unpredictable.
Traditional journalists hew to the inverted pyramid when it comes to structuring their articles. That is, they place all the most relevant and important information in the first paragraph, and put unnecessary details further down the article. While this is a good practice for news stories, with blog posts you can shake things up a bit. By doing a right-side up pyramid, in which you tease readers with the more important info toward the bottom, you can effectively get your audience to read with bated breath till the very end. Be careful with this style, however, because it can easily turn into an exercise in boredom. Be sure to make each paragraph interesting and suspenseful in its own right.

 Posts
Posts


