Tuesday, January 11, 2011

New feature: Geotagging
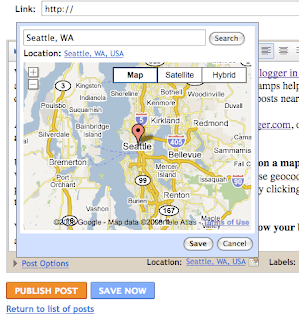
We've just added geotagging to the new post editor on Blogger in draft. With geotagging, you can add a location to your each of your blog posts. Just as time stamps help readers find posts from a certain date or time, geotags give your readers a way to browse posts near a specific location.

Adding a geotag to your post is easy. Log into draft.blogger.com, open the post editor, and click the add location link below the main text field.

Use the location editor to search, drag, click and zoom on a map to choose and save a location. We'll try to label the location you choose using our reverse geocoder, which looks up a name for a point on the map. You can also edit the location name by clicking the blue location name text below the search field.

When you publish your post, the geotag is displayed below your blog post as a link, which will open up Google Maps.

We also include each post's location in your blog's RSS and Atom feeds using GeoRSS, a standard for geotagging. This means that feed readers, map applications and search engines can associate your posts with their locations.
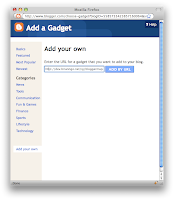
We're still working on other ways to show geotag information on your blog. Brian, the Google engineer who created this feature in his 20% time, has written a gadget that will display your posts on a map. To add it to your blog, click "Add Your Own" on the "Add a Gadget" page and paste in this URL: http://blogmap-gadget.googlecode.com/svn/trunk/blogmap.xml

Geotagging has a few known issues. We'll be addressing them shortly, but here are some suggested workarounds for the near-term:

  • The location editor is hidden behind the text field in the Edit HTML tab. Please switch to the Compose tab to view and edit locations.
  • A geotag cannot be removed from a post once it has been saved. If you need to remove a geotag, please copy your post content into a new post and delete the geotagged post.
  • Update 2:33pm: If you have a customized template and you don't see the "Location:" byline, you may need to reset your blog's widget template. Do this by going to the Layout > Edit HTML tab in your dashboard, and then clicking Revert widget templates to default below the main text field.
  • Update 2:33 pm: Some users are having issues with the blog post map gadget. Brian is investigating.
What types of posts are you adding a location to? What other functionality would you like to see in this feature? Leave us a comment and let us know what you think!

Autosave and Automatic Date and Time

We've recently added two new features to the post editor on Blogger in draft: autosave and automatic date and time.

Autosave is a feature we've had for a while on the old post editor, and it does what you'd expect: automatically save your draft posts when you pause in your typing. We've brought the same convenience and safety to the new post editor.

With automatic date and time, your posts will now be timestamped with the date and time that they're published, not the date and time when you first opened the post editor (as has been the case). You can of course still explicitly set the date and time by opening Post Options and switching to Scheduled at instead. Once a post is published, it will keep its date by default, even if you go back even if you go back to edit the post and re-publish.

Better Mobile Posting

Blogger already has several ways to post via a mobile device, but who knew? With our last release to Blogger In Draft, we've made it a lot easier to set up mobile posting to your blog via SMS, MMS, and email.

If you already have a blog on Blogger, you can configure mobile posting by going to your Blogger Dashboard on draft.blogger.com.

Enable SMS or MMS for your mobile device by clicking on the gray phone icon next to your blog name.


We'll show you a claim code that you can send to Blogger via SMS or MMS to register your device and link it to your blog.


Once you've registered your device, you're done! Messages you send to BLOGGR (256447) will be posted to your blog. Note: SMS posting on Blogger currently does not work with T-mobile devices.

To enable Email posting to your blog, return to your Blogger dashboard and click on the gray envelope icon. You'll see a dialog that prompts you to define a secret email address.


Emails you send to this email address will be posted to your blog. Include a photo in your post by sending it as an attachment. Blogger will insert the photo between the title and the body of your post.

To edit your Mobile settings, you can click on the phone or envelope icons on your Blogger Dashboard, or go to the Settings > Email & Mobile tab.


If you are away from your computer, but want to create a blog on-the-go you can also create a blog directly from your mobile device. Follow these instructions to create a blog from your phone and claim it later.

Let us know how the service goes by leaving a comment. If you experience problems please tell us what type of device you're using, your cellular carrier, whether you used SMS, MMS, or Email posting, and your blog URL. Also please note that SMS posting is not yet available for T-mobile devices. Thanks!

Contribute Gadgets to Blogger

Calling all Developers! We've just launched several extensions to the Gadget API that will enable developers to build more relevant and engaging gadgets for Blogger.

As you may already know, every Blogger blog is a gadget container. What's more, every blog is an OpenSocial gadget container powered by Friend Connect. That means as a gadget developer you can leverage social APIs to build engaging tools for bloggers and their audience.

In addition to leveraging social data, gadgets can now access a blog's post and comment feed via new JSON APIs. For example, with this data you could easily build a map gadget that maps the geo-location of posts, or a "Most Commented On" gadget that ranks posts by the number of comments they've received.

Need to be inspired? Recently we asked our users what gadgets they most wanted to see in Blogger. Hundreds responded and here's their wish list.

When you build a gadget for Blogger, it becomes available to millions of active bloggers. Just submit your gadget to us, and within thirty minutes it will surface in the Blogger gadget directory where users can easily browse, configure, and add your gadget to their blog's sidebar.
So now that you know Blogger is a great distribution platform for your gadget, what are you waiting for? Get started building Gadgets for Blogger now.

Important Note: The APIs and documentation are new, so there may be bugs. Let us know by posting to the Blogger Developer Group if you run into problems developing your gadget.

4 New Gadgets from Blogger Buster

Amanda from Blogger Buster has developed 4 new gadgets for your blog's sidebar.

Display thumbnails of your most recent Picasa photos.
Add it now

Share your recent Twitter updates
Add it now

Show your most recent posts, with optional summaries
Add it now

Show your most recent comments, with optional summaries
Add it now
To add these gadgets go to your blog's Layout tab, click Add a Gadget, and then click Featured. There you'll find Amanda's gadgets along with other gadgets we are currently featuring.


You can stay updated when featured third-party gadgets are added by subscribing to the Blogger Featured Gadget blog.

Interested in building useful gadgets for bloggers? Get started now by reading the Blogger Developer Documentation.


Note: Currently some third-party gadgets will not display correctly in the Chrome browser. We are working on a fix for this.

You Might As Well Jump!

by Sean McCullough, Software Engineer, Blogger
(cross post from Blogger Buzz)

It's time to announce another Blogger Birthday feature! Many users have been asking for an easy way to implement "Read more" links on their blog's index page. In fact, for years bloggers have been implementing "Read more" jump breaks themselves by manually editing their HTML --- a process that was complicated and error prone.

Today we are excited to announce our latest birthday present: Jump Breaks.

With Jump Breaks you can show just a snippet of your post on your blog's index page. Blogger will insert a "Read more" link to the full post page where your readers can keep reading.


There are a couple of ways to insert a "Read more" jump to your posts. If you use the new post editor (available on Blogger in Draft, or by enabling it via the Settings tab), you'll notice the "Insert jump break" icon in the editor's toolbar. Click this icon and the "jump break" will be inserted into your blog post at your cursor's position.


If you don't use the new post editor, you can still insert a jump break in Edit HTML mode by adding <!-- more --> where you want to position the jump break.


Want to change the "Read more" text to something more your style? No problem. You can edit the "Read more" text by clicking Layout and then Edit the Blog Posts widget.


One more note, the Jump Break feature does not change how your post appears in your feed. You can configure post feed options by going to Settings | Basic | Site Feed, and editing Allow Blog Feeds.

Update
: Users that have customized their Blog Posts widget or otherwise have highly customized templates: You may need to edit your HTML to enable Jump Breaks. First, back up your template, then follow the instructions at the bottom of this help article.

Happy Birthday from Blogger!

Geo Re-enabled

Update: Geotagging is re-enabled.  (11/17/2009)

We've temporarily disabled the geotagging feature in the Blogger in draft post editor due to it not working and showing that annoying JavaScript alert.

The feature will come back once we fix it up. Sorry about the inconvenience.

Better Image Posting on "Blogger In Draft"

We've added a couple of image upload improvements and UI changes to the editor on Blogger In Draft.

You'll notice that the Insert Image and Insert Video buttons look a bit different in the new editor's toolbar.


In addition, the Insert Image dialog now lets you choose the destination album for your image in Picasa Web Albums.


Better yet, you can easily choose from photos you've already uploaded to Picasa.


Finally, the video upload interface is updated as well.

As you try out these features, let us know how it goes in the comments.

Thanks!

Look Up Words as You Compose

by Awaneesh Verma, Dictionary Product Manager


We recently added a dictionary with definitions and translations to "Blogger in Draft." Here's a quick tour of the feature and its functions.

Look up definitions: To look up the definition of a word or phrase, simply highlight it and click the dictionary icon in the editor's toolbar:


This will open the dictionary's Define tab, where you can view definitions for words and phrases across 12 languages.

Get synonyms: If you'd like to see synonyms for an English word, begin by looking up its definition as above. Then, click a hyperlinked synonym to browse to its definition, and click Insert or Replace to add the currently displayed word to your composition:


Currently, synonyms are available only in the English dictionary.

Translate: You can use the Translate tab of the dictionary to translate words and phrases between over 50 languages.


Similar to the Define tab, you can navigate translations by clicking them and can feed them back to the post by clicking Insert.
We hope you find this dictionary a useful composition tool. Please let us know what you think by leaving us a comment below. Thanks!


Pages come to Blogger In Draft

by Sean McCullough, Software Engineer


Update (1/21 @ 8:54am PST): We've temporarily disabled creating & editing pages. You can still view the pages you've already created. We will re-enable ability to create and edit pages soon.


Update (1/21 @ 9:32pm PST): Pages are back on.


Pages have been a top requested feature, and they are now available on
Blogger in Draft!

Blogger Pages lets you to publish static information on stand-alone pages linked from your blog. For example, you can use Pages to create an About This Blog page that discusses the evolution of your blog, or a Contact Me page that provides directions, a phone number, and a map to your location.


You create a page similar to how you write a blog post. From Blogger in Draft click the Posting | Edit Pages tab, then click New Page. (Note: you can create up to 10 pages.)


Once your page is published, you can link to it from the new Pages widget. The Pages widget lets you add links to your pages as tabs at the top of your blog, or as links in your blog's sidebar.


In the Pages widget, you can decide which pages will have links, and in what order they will appear. You can also choose whether or not you want links automatically created for pages when you create them by checking or unchecking the box to the left of Add new Pages by default.


Finally, for those of you that have custom templates, your custom template may not automatically support Pages as horizontal "tabs". If you are familiar with HTML, follow these instructions on how to add Pages to your custom template.

Let us know how it goes in the comments!

Improvements to Blogger In Draft's Text Editor

by Jiho Han, Software Engineer

We've made a couple of improvements to the Text Editor on
Blogger in Draft

Add captions to your photos 

Now you can easily add captions to the images you include in your blog posts! To add a caption, simply click on the image you've inserted, and click Add caption.


Then you can write your caption just below the image. 


Expandable Edit Region

In addition to captions, we've recently added another new feature for you verbose bloggers out there. You can now expand the text area of the editor to give yourself more room as you type. To make the editor region larger, simply click the corner of the editor and drag it down.
The editor window will also grow automatically as you run out of space.

Faster Video Uploading

Your time is very important to us, and we are continuously working to make your experience on Blogger fast and easy. We know that it's no fun waiting for your videos to upload, so we've recently made speed improvements to make your videos upload faster.

Let us know what you think of these features in the comments below, and thanks for using Blogger!